OBS Studio 21 is awesome! Other than the obvious (open source, cross platform), I’d say it’s finally at the point where it’s ready to be taken seriously by professional broadcasters.
On my list, the big thing that OBS Studio 21 brought that it was missing was Audio Ducking to the Compressor. Pair that with the Noise Gate, and you configure a clean auto-mix on any platform.
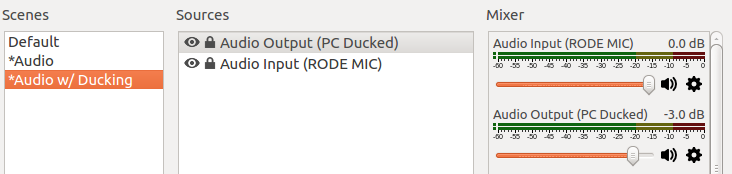
Here’s a quick look at my current audio configuration that ducks the audio whenever I speak:
I’m still experimenting with it, trying to make it better, but it gets the job done. The goal of such a configuration is something that auto-balances you and the audio, so that when you have nothing to add (commentary), more of the original audio can be enjoyed.
Tip: Browser Sources
I’m not going to cover this here, but the killer feature of OBS is the Browser Source. On Linux you need to install a separate plugin, but it’s just as featured as the Browser Source that ships with Windows. This add so much, letting you create borders, splashes, lower 3rds, and so much more using modern Web technologies (HTML5, SVG, WebGL, etc).
One of the crazier things to realize is you can do HTTP fetches or open a WebSocket connection to a server, giving you live data that can manipulate your Scenes. Holy cow!
Tip: WebSocket Remote Control
I’m also not going to cover it here, but there’s an excellent plugin for OBS that runs a WebSocket server you can remotely connect to and control OBS running on a local or remote PC.
https://github.com/Palakis/obs-websocket
Tip: Scene Sources
I’m not sure when this was added, but a really useful organization feature in the most recent OBS Studio versions is Scene Sources. Essentially, you can insert Scenes in to other Scenes. This is super useful since we can add our Audio or Video sources to a dummy Scene, fine-tune the configuration once, then insert the configured scene anywhere we want.
Tip: Remove the default Audio
From Settings->Audio we can configure the Desktop Audio Device, and our Mic/Aux Audio device, say if you have multiple audio devices plugged in to your PC. More importantly though, we can select Disabled for both.
This doesn’t mean we have no audio, it just means we have no audio by default. We can explicitly add audio devices to a Scene, giving us much more flexibility in what devices are available at what time.
Create dummy Scenes for Audio
We’re going to create two dummy Scenes for audio: “*Audio” and “*Audio w/ Ducking“, the * being a way to know from the name it should be included and not used. Then using Scene Sources, the desired audio configuration can be added to each Scene.
The default “*Audio” scene is bare, just a simple Audio Output Capture. No filters necessary. In my case the audio level is set to -3 db, but you could probably get away with 0 db.

The more advanced “*Audio w/ Ducking” scene is much more complicated. It has 2 devices, a 2nd separate copy of our Audio Output Capture (not a reference), and an Audio Input Capture of our Microphone.
The ducking configuration is pretty straightforward. Just a single filter.

The way ducking works, if there is a signal found on the Sidechain (i.e. NOT silence), then the compressor takes effect. The effect described above is a super harsh crush, 32:1 compression on any signal above -48 db. Or put another way: I make the audio 32x quieter when a signal is found.
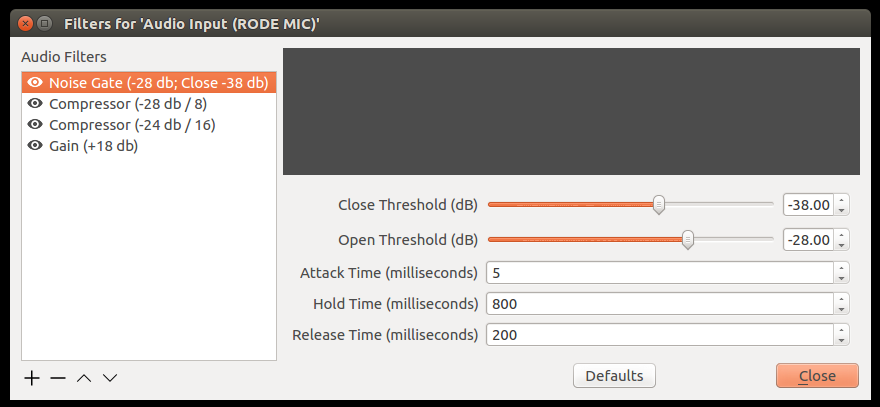
So to give me no signal, I have a Noise Gate set up on the Microphone.
I have a fancy microphone setup. Without getting too detailed, I’ve set it up physically in a place and with a pre-amp gain that when talking normally, I get a signal between -30 and -20 db. If I get louder or closer to the mic, the volume goes up (hence the later compression stages, but I’ll get to those later).
Through experimentation, I decided that a -28 db signal was the sweet spot. 95% of my keystrokes aren’t that loud (I have a mechanical keyboard), and my quiet grunts tend to fall below that.
I have to speak up to break the gate threshold. The -38 db close threshold lets me soften my voice as I speak, and the 800 ms hold time lets me pause for up to 0.8 seconds before it attempts to close the gate.
Tip: Use a separate Gain as your last Filter
Instead of using the Output Gain of the Compressor, you’re better off adding a separate final-stage Gain filter.
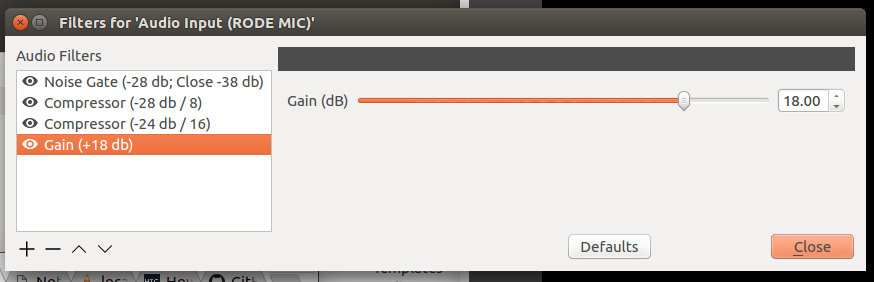
The reason this is better, is because once a signal is pushed to 0 db or above, sound data is blown-out and lost. In my case, I get to chain together multiple Compressors, and because my source stays well under 0 db, I don’t lose any fidelity (other than what the Compressor is destroying or revealing).
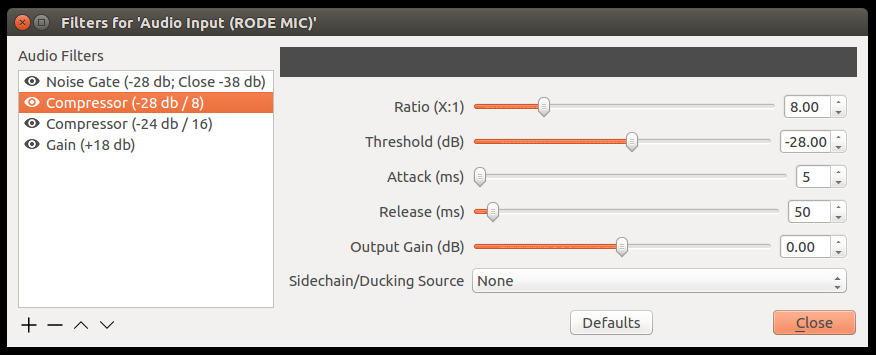
Multi-stage Compression
Compressors reduce the range of audio levels. When an audio level passes a Threshold, the audio above that Threshold is scaled down by the Ratio (i.e. the bigger the number, the greater the reduction). Since a compressed audio signal no longer takes up as much of the full audio range, you can then push the overall level up with Gain without peaking.

As the name suggests though, audio range compression potentially affects the audio quality. In general compression sounds good, but if you push it too far it can sound bad (see the Loudness War).
I have a good microphone, so I decided to use 2 compressors: one lighter, one harsher. The goal is to keep my mic level under -6 db, but I do it in stages so the harsh drop doesn’t happen until I really push it.
The levels I chose are the result of experimentation. I recorded stuff, watched my meters, and played with ratios and thresholds until I was happy with how I sounded quiet, normal, and loud.
Attacks and Releases were more experimentation. I want my compressor to kick in rather quickly (5 ms), but I want to avoid any pops that a 0 ms Attack might result in. I haven’t done too much refinement to my Releases, except my Noise Gate and Ducking Compressor release I wanted it a bit slower/smoother.
Why 2 *Audio Scenes?
Lets say you have a “Be Right Back” Scene, something you show when you step away from the computer, need to take a phone call, etc. Rather that having to manually mute the microphone, having a separate non-mic Audio scene lets your BRB Scene play just audio without it being ducked. In addition, it can be used to set different volumes depending on what’s on screen. And alternatively, if you have channel “elevator” or BRB music, you could play that instead of the regular audio, so the listener can tell the difference between BRB and something happening with just their ears.
OBS Studio is clever, and it actually cross-fades the video and audio between scenes. If you see the mixer getting busy as you change scenes, this is what’s happening.