One of the things on my blogging TODO list is to show how I work. Many coders find it odd to hear that I work on Windows without Visual Studio, or that I work on the Mac by rarely touching the Mac. Just me, a text editor (a good one), and a bunch of useful scripting.
In my current project though (Smiles PC), I’ve run in to a slight brick wall that requires me and my development arch nemesis to join forces. It’s almost funny, but it’s been about 10 years since I’ve had to touch a Microsoft compiler. Normally I’d be reluctant, but we’re talking a distribution issue here… and that’s how I get paid. 😉
So, today’s when I swallow my command line pride and get Smiles building with Visual Studio.
This post is long, nuanced, technical, and mostly for my own benefit. So if you’re up for an over analysis of Windows Developers favorite development tool, hit the link.
Overview
Over the past few, days I grabbed the Visual Studio 2008 trial and Service Pack. Four some gigabytes and several hours later, we have a couple ISO images ready for burning and installing.
Now, I’m not going to walk through the entire process. That would just take too long (and be pointlessly boring). Instead, I’m just going to dive in to some note taking. Things I wanted to know as soon as I clicked on the technicolor figure eight. My goal with Visual Studio right now is to CLEANLY integrate a Visual Studio project file in to a shared hierarchy of MinGW, Linux, and XCode branches. It should be useful to Mac or Linux coders coming from the other side, or REALLY WEIRD Windows coders like myself.
Installing SDL in Visual Studio
I use SDL for my Windows and Linux ports, so the first step was to install the libraries. It’s pretty easy to do these days, as the SDL people provide pre-built libraries for Visual Studio and MinGW. I’m using Visual Studio 2008 (i.e. Visual C++ 9.0), so I grabbed the VC8 files.
SDL is something I consider a core library when I work, so I have no qualms about putting its files right in the default folders. So I grabbed the include and lib folders from the SDL package and placed the contents in the appropriate places here (with ONE change… see below):
C:\Program Files (x86)\Microsoft Visual Studio 9.0\VC\include
C:\Program Files (x86)\Microsoft Visual Studio 9.0\VC\lib
For those unfamiliar with 64bit Windows, your 32bit apps get installed in a Program Files (x86) folder, so you can differentiate.
That change I spoke of was instead of copying the include folder as is, I renamed it to SDL and placed it under the VC include folder. I did this because this is what SDL for MinGW does. For some reason it’s not the same, I’m not sure why, but whatever. It’s consistent now.
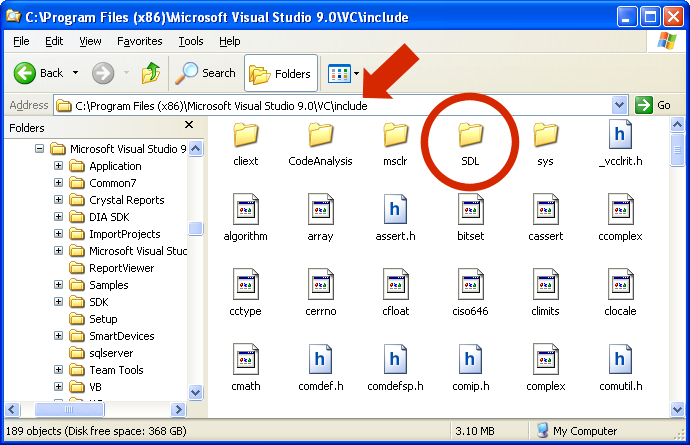
Storing SDL includes inside an SDL folder
Now that this is done, I can simple include it as:
and add the SDL.lib and SDLmain.lib as appropriate.
If you’re following me along, be sure to grab SDL.dll, as you’re going to need it later.
Modern Visual Studio Projects
The next part involves tearing apart a generated stock project hierarchy. Visual Studio has a common way it structures projects, but that doesn’t mean it’s good. Lets break it.
SDL uses a derivative of the Win32 Application settings. It’s actually not that difficult to switch modes inside the project settings, but we may as well start from something that will require the fewest changes.
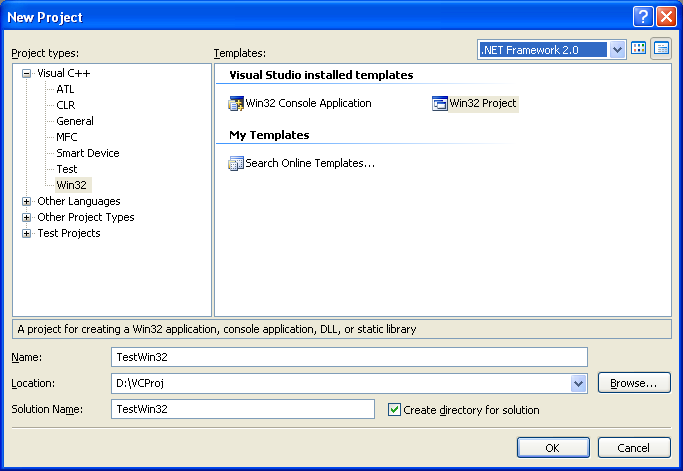
Creating a new project in Visual Studio 2008
A rule of thumb with portable game development is you always work from the lowest spec or version of something possible. I suspect .NET is not actually used in stock Win32 Applications, but none the less, I’ve chosen .NET 2.0 as opposed to 3.5 that was the default setting.
Visual Studio 2008 uses some unusual terminology with projects. The idea is that you create solutions, and a solution contains 1 or more projects. Projects are a single target, be it an executable, a DLL library, or an include library (.lib). You may be familiar with this arrangement called workspaces in other development suites.
In the create dialog above, the name you specify is the name for the project, and all the elements it generates (folder, .cpp files, executable). The solution name on the bottom defaults to the name above, but you can change it easy enough. The entire product gets wrapped in a solution named folder, and all the code is placed under the named folder. This can look weird at first, as the default behavior creates a folder of the same name inside the solution folder.
Files from a stock project
I had to experiment and dig through MSDN for a while to figure out exactly what the various element files were. Here’s a list.
SolutionName.ncb – The Intellisense database (i.e. code completion), generated at runtime. This gets pretty large, so omit it from version control (SVN). SolutionName.sln – The XML based solution file. References all projects. SolutionName.suo – A binary accessory file for the solution. May be hidden. Project/Project.vcproj – The XML based project file. References all code files and contains build settings. Project/Project.vcproj.COMPUTERNAME.UserName.user – I’m assuming this is local computer related settings (I.e. what files I have open, as opposed to other users). You can delete it and things work just fine. You can omit this from version control (SVN). Project/stdafx.cpp and .h – Precompiled header support files. You can disable this feature from the project settings, and shut up a whole bunch of warnings related to not having them. Project/Project.rc – Windows resource file (text). Vaguely similar to an X-Code “.plist” and “.xib” files, except it’s only for specifying things like the icon, window layout templates, and so on. Project/Project.ico – Windows icon file. Despite what Windows explorer may report, it actually contains several icon sizes. Project/small.ico – Legacy small icon file? Exactly the same as Project.ico. Project/targetver.h – Minimum Windows version requirements for the resource file. Inside the resource file, you can can just comment this out.
The rest of the files are the sample code (+ a text file).
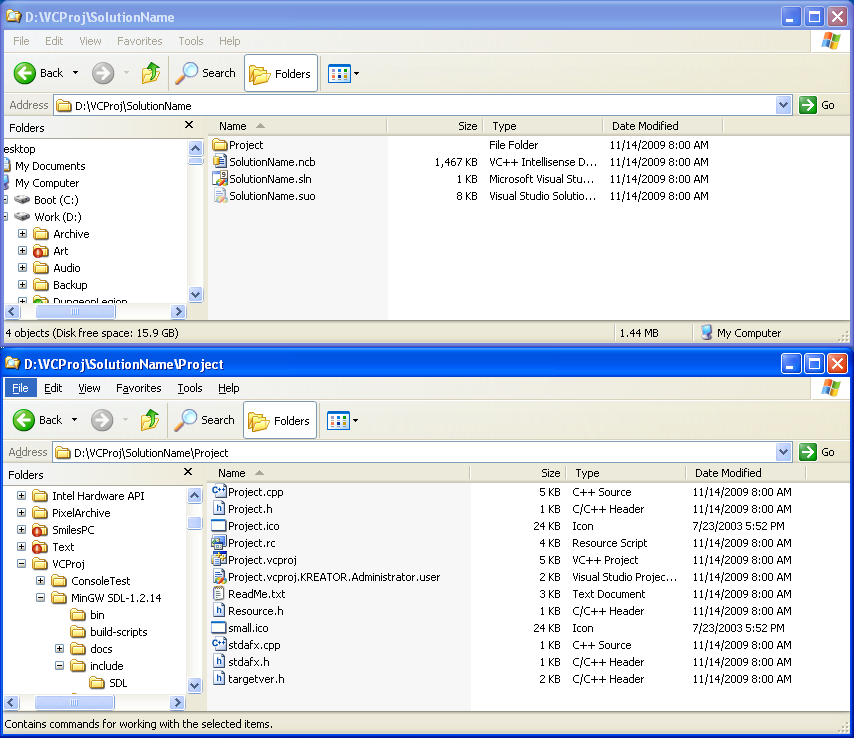
Files generated by a stock Win32 Project in Visual Studio 2008
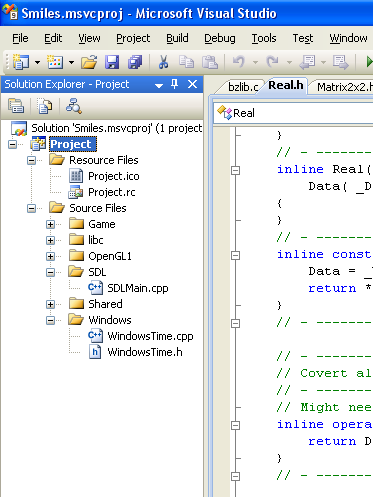
The Solution Explorer
With our “solution” loaded, we can start hacking it to bits. The majority we can do right from the Solution Explorer itself.
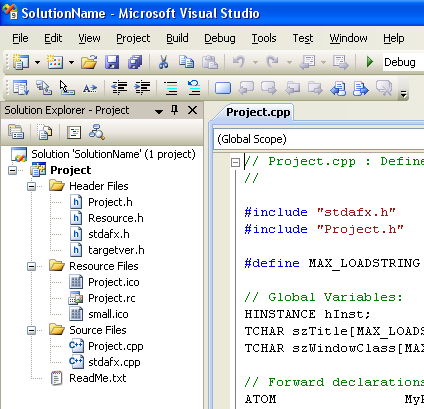
The Solution Explorer… err… project viewer
Right clicking on the files and folders here, we can add new ones or remove existing ones.
However unlike Xcode, folders here are not actually folders. Visual Studio uses a term “filters“, since the hierarchy you create is completely virtual and doesn’t exist on disk.
Also unlike Xcode, you can’t set up folder like links that reference all files in a directory. I use this feature myself with Xcode, as I have several generated “.cpp” for data that’s just too small to keep external, and embed in to the binary instead (menus). Instead, this means you’ll have to drag+drop directories you want in to your project any time there is an update. On the plus side, you CAN drag+drop folders containing other folders of code. On the down side, your folder hierarchy isn’t preserved when you do it. Meh.
Dragging a tree over dumps all the file in the same place
Project Properties
Project usability aside, we can easily make the compiler and build process behave exactly as we want. Right clicking on the Project’s name and selecting properties gives us a comprehensive list of compiler, linker, and target options. Many special variables exist too for building useful paths.
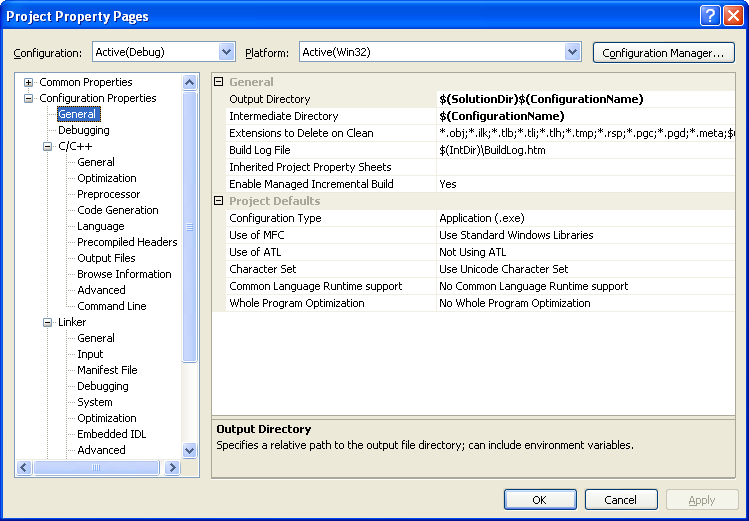
IDE complaints aside, I can make the compiler do what I want
Each section after Debugging (C/C++, Linker, etc) has an option called Command Line. It gives you a complete listing of all command line arguments you’re passing to CL, set by enabling/disabling the options you’ve chosen here in properties. This would be an invaluable reference if you wanted to set up a makefile for building. Mike is pleased. 🙂
There’s a lot of options here, so I’ve gone through and made a list of several that seem useful. I’ve placed a star (*) beside the ones I find most important to creative structural uses.
- General
- Output Directory – Where the .exe goes *
- Intermediate Directory – Where junk (.obj) goes *
- Debugging
- Command Arguments – Arguments for the .exe
- Working Directory – Where to execute from. Default is the project folder (i.e. blank). *
- Environment – Custom environment variables to set
- C/C++
- General
- Additional Include Directories – Where to find more .h files *
- Detect 64bit Portability Errors – Default is no
- Treat Warnings as Errors – Default is no
- Preprocessor
- Preprocessor Defenitions – #DEFINE’s for the command line. Semicolon delimited. *
- Code Generation
- Enable C++ Exceptions – Default is Yes
- Runtime Library – Multithreaded with or without DLL. Default is with.
- Precompiled Headers
- Create/Use Precompiled Headers – Default is Use (Yes). Can stop many errors with No. *
- Advanced
- Calling Convention – Default is __cdecl. Some DLLs rely on or expect __stdcall.
- Force Includes – Specify 1 or more .h files to include in every compiled file. *
- Undefine Preprocessor Definition – Remove a system default define
- General
- Linker
-
General
- Output File – Where and what the .exe is called *
- Version – Version number in the .exe header
- Additional Library Directories – Where to find more .lib files *
-
Input
- Additional Dependencies – Any extra .lib files you use. SPACES not semi colons.*
- Examples: SDL.lib SDLmain.lib opengl32.lib glu32.lib
-
Advanced
- Entry Point – Change the startup function from main to something else
- Target Machine – Default is MachineX86
-
- Resources
- General
- Preprocessor Definitions – #DEFINEs for resource files. Semicolon delimited.
- Additional Include Directories – Where to find .h, .def, or .res files, when manually scripting resources.
- General
- Build Events
- Pre-Build Event -> Command Line
- Pre-Link Event -> Command Line
- Post-Build Event -> Command Line
Next I just want to comment on a few of them that are important to structure.
General -> Output Directory *
This is where the executable goes. The default is $(SolutionDir)$(ConfigurationName), which says put them in the root solution folder under Debug and Release respectfully (i.e. the configuration name). My sample project goes here:
D:\VCProj\SolutionName\Debug*Project.exe*
That’s probably an alright location for a Windows only project, but that adds clutter to your root directory. I’d go with the following myself.
$(SolutionDir)output/$(ConfigurationName)
Which places your binary here:
D:\VCProj\SolutionName\output\Debug*Project.exe*
That way, the root folder only contains a single output folder no matter how many configurations there are.
You can refer to this directory elsewhere with the $(OutDir) variable.
General -> Intermediate Directory *
This is where the “.obj” and other temporary files go. The default location is $(ConfigurationName), which is rather sloppy if you ask me. This evaluates to a Debug or Release folder under the project directory.
D:\VCProj\SolutionName\Project\Debug\ <– Sloppy!
I especially dislike this because it’s placing junk folders along with your source code. Instead, I’d go with this
$(SolutionDir)obj/$(ProjectName)/$(ConfigurationName)
Which places your junk files here:
D:\VCProj\SolutionName\obj\Project\Debug\
A single location for all your intermediate files. Then if you’re like me, you can add a simple SVN rule to ignore everything under the obj folder.
You can refer to this variable elsewhere with the $(IntrDir) variable.
Debugging -> Working Directory *
Rather important, as you may have a certain place outside the project or source tree where you want your game to find it’s content. The default is the project folder itself (i.e. blank). You may want to make it “$(SolutionDir)“, or perhaps something like “$(SolutionDir)Content/“. Your application will search for files relative to that base directory.
Property Final Notes
It should be noted that, just like Xcode, you need to configure the options of each build separately. The configuration drop-down list-box at the top of the window is especially useful for this. Default there being your currently Active configuration, and the last option allows you to edit them all at once. Beware, you might ruin the stock DEFINES using all.
That’s everything we need to know to make some structure decisions.
The Dummy Solution
Using our newfangled Visual Studio powers, we’re going to create a solution for dummies. No, not exactly, but I’ll be creating a dumb solution and project file that I’ll gut.
I don’t like all the junk files a solution creates though. We’re talking 3 files, plus a directory of stuff. Xcode, or rather, OS X does something I like to call Magic Folders. From the Mac’s side, Application Bundles and Project Files appear to be self contained files. In fact, they’re actually directories with a special property that makes double clicking on them do something else. On Windows you’d enter the folder, but on OS X it either launches the Application or fires up Xcode.
I can’t really achieve the same behavior on Windows, but I can borrow some cleanlyness ideas. All the projects data for Xcode projects lives in a MyProject.xcodeproj folder. I’m going to do the same thing. Place my solution and project inside a MyProject.msvcproj folder. One folder, instead of 3+1 files. That’s a far cleaner root directory.
The Result
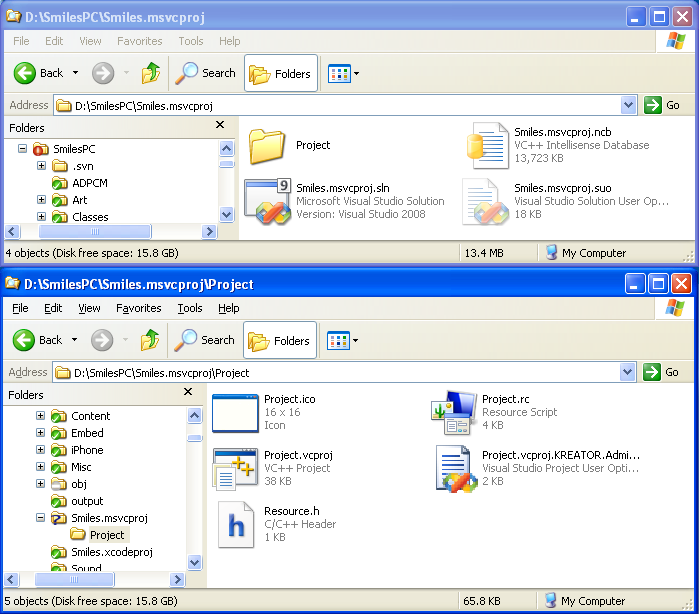
Gutted Visual Studio Project and Solution. Only kept the resources.
The solution I actually named with a “.msvcproj” in it’s name. I was worried at first it would generate something broken (using dots), but it works just fine. The project I called “Project” for some reason. That then means the output executable will be called Project (default), at least until I change it. I alternatively could have named it Smiles, since I am calling the solution something different (Smiles.msvcproj).
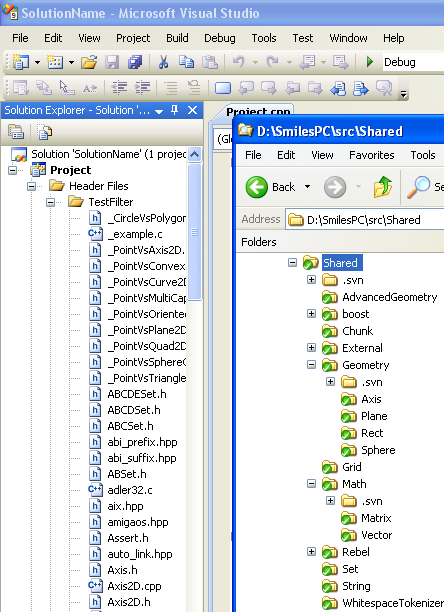
Next I “sort of” rebuilt my hierarchy. My code is further broken up in to topical directories. Each directory I created a “filter” for inside the project, and dragged the contents in.
How the project looks in Visual Studio
For an idea of what each of these are:
Game is the game code. Shared is common game unspecific code. SDL is the SDL specific code (i.e. main, input). OpenGL1 is the Fixed Function version of my graphics library (OpenGL 1.x, ES 1.1). libc is the libc version of my data and file serialization code (uses fopen, memcopy). Windows is Windows specific code, which is currently only timers.
Depending on which platform I’m targeting, the Game and Shared stay the same, but I mix and match the other 4 as needed. For example, iPhone OS uses the iPhone startup code in place of SDL, and the Unix timer code in place of Windows.
As for project settings, I used the following.
Output Dir: $(SolutionDir)..\output\msvc$(ConfigurationName) Intermediate: $(SolutionDir)..\obj\msvc$(ConfigurationName)
That way, the Visual Studio build can share the same output and obj tree used by the makefiles, placing garbage files in the same place. The specific build goes in the msvc/Debug and msvc/Release directories, just so it’s clear that’s the Visual Studio target and not the MinGW.
The working directory is a folder back from the solution directory, since I currently look from the root directory for my content.
Working Directory: $(SolutionDir)..\
I have several include directories to add. Every single directory above needs to be added since I use <> style includes to access files outside the local directory.
Additional Include Dirs: ....\src\Game;....\src\libc;....\src\OpenGL1;....\src\SDL;....\src\Shared;....\src\Windows
You’ll also note I’m using double ..’s to specify paths. I could have alternatively used *$(SolutionDir)..* in it’s place, but *....* is shorter.
I have several defines as well, to say what variations of code I should be using. OpenGL versus OpenGL ES, SDL versus iPhone, etc.
Preproccessor Defines: USES_SDL;USES_OPENGL;USES_WINDOWS
Precompiled headers are disabled, as I didn’t want to include the silly stdafx file in my source.
Output file I renamed as suggested above.
Output File: $(OutDir)\Smiles.exe
Finally, the libraries I link. SDL and OpenGL.
Additional Dependencies: SDL.lib SDLmain.lib opengl32.lib glu32.lib
And that’s it. Everything I needed to get the game to compile on MSVC.
Conclusion
The perfect way to end this post would be to show a screenshot of the game built and running from Visual Studio, but alas I still have more work ahead of me. GCC has far better C++ initializer list support, which I promptly took advantage of in my Matrix Math code. However this isn’t GCC, so I still have a little bit of work ahead of me to make it work on both.
That’s it for now. If you made it this far, wow!